


Hello, and welcome to another blog post about Linux! Today, we are going to learn about shell permissions, and how to use some commands to manage them. Shell permissions are the rules that determine who can access, modify, or execute files and directories in a Linux system. They are very important for security and functionality reasons, so let's dive in!
There are three sets of permissions that apply to each file or directory: owner, group, and other. The owner is the user who created the file or directory, or who has changed its ownership. The group is a collection of users who share some common characteristics, such as being in the same department or project. The other is everyone else who is not the owner or in the group.
Each set of permissions can have three values: read (r), write (w), or execute (x). Read means that the user can view the contents of the file or directory. Write means that the user can modify the file or directory. Execute means that the user can run the file as a program, or enter the directory.
To see the permissions of a file or directory, we can use the ls -l command, which will show something like this:
-rw-r--r-- 1 alice staff 123 Jan 14 11:14 file.txt
drwxr-xr-x 2 bob admin 456 Jan 14 11:14 dir
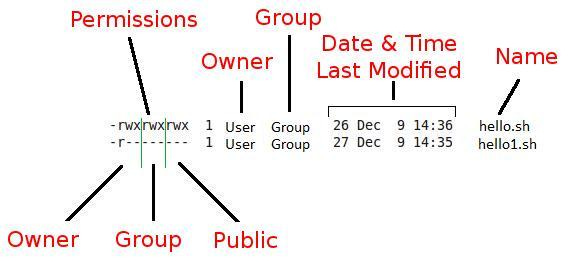
The first character indicates the type of the file: - for regular files, d for directories, l for symbolic links, etc. The next nine characters show the permissions for the owner, group, and other, in that order. The next two columns show the owner and group names, followed by the size, date, and name of the file or directory.
To change the permissions of a file or directory, we can use the chmod command, which has two main ways of usage: symbolic and numeric. The symbolic way uses letters and symbols to specify which permissions to add (+), remove (-), or set (=). For example:
chmod u+x file.txt # adds execute permission for the owner
chmod g-w dir # removes write permission for the group
chmod o=r file.txt # sets read permission only for the other
The numeric way uses numbers from 0 to 7 to represent each set of permissions as a single digit. The number is calculated by adding 4 for read, 2 for write, and 1 for execute. For example:
chmod 755 dir # sets rwx for owner, rx for group and other
chmod 644 file.txt # sets rw for owner, r for group and other
chmod 000 file.txt # removes all permissions for everyone
To change the owner or group of a file or directory, we can use the chown and chgrp commands, respectively. For example:
chown alice file.txt # changes the owner to alice
chgrp staff dir # changes the group to staff
However, only the owner of a file or directory, or a superuser (also known as root), can change its ownership. A normal user cannot chown a file that they do not own, because that would be a security risk.
To run a command with root privileges, we can use the sudo command, which stands for "superuser do". This command will ask for our password, and then execute the command as if we were root. For example:
sudo chmod 777 file.txt # changes permissions to rwx for everyone
sudo chown bob file.txt # changes owner to bob
To change our user ID or become superuser, we can use the su command, which stands for "substitute user". This command will ask for the password of the user we want to switch to, and then start a new shell session as that user. For example:
su bob # switches to bob's account
su # switches to root's account
To create a new user or group in a Linux system, we can use the useradd and groupadd commands, respectively. These commands have many options to customize the new user or group, such as their home directory, password, shell, etc. For example:
useradd -m -s /bin/bash alice # creates a new user alice with a home directory and bash shell
groupadd staff # creates a new group staff
To print our real and effective user and group IDs, we can use the id command. The real ID is the one that we logged in with, and the effective ID is the one that is used to determine our permissions. They are usually the same, unless we use commands like sudo or su to change them. For example:
id # prints our real and effective IDs
id bob # prints bob's IDs
To print the groups that we or another user are in, we can use the groups command. This command will show all the groups that we belong to, either as primary or secondary members. For example:
groups # prints our groups
groups alice # prints alice's groups
That's all for today, folks! I hope you enjoyed this blog post and learned something new about shell permissions. Stay tuned for more Linux tips and tricks, and don't forget to leave a comment if you have any questions or feedback. Thanks for reading!